Last night during Earth Hour, we dutifully turned out our lights hoping it might get the attention of the "powers that be". One hopes they are paying attenion, but who knows.?!?
Maybe they are too busy sipping brandy in their penthouses to look out the window and notice the darkness!
We have an old Jotul #6 woodstove that can be opened up and used as a fireplace. We hardly ever use it that way because it is more efficient to close it up. (It is still quite cold here in NY). Last night however, was a perfect night to open it up!
My husband took this video. It was quite a pleasant way to spend an hour.
The only down side was that I was not able to get any stitching done! I thought about all those stitchers in the olden days, working by the fireside. I guess they had better eyes than I do. Unfortunately I need my magnifying light!
Sunday, March 30, 2008


Monday, March 24, 2008
February's Love is Done on The Red Thread
I managed to finish up February last night.
I made a little start on March's "Go Fly a Kite".
Hopefully I will be caught up soon!

Hmmm! Still not entirely sold on these colors. I guess time will tell!
I made a little start on March's "Go Fly a Kite".
Hopefully I will be caught up soon!
Hmmm! Still not entirely sold on these colors. I guess time will tell!
Sunday, March 23, 2008
China Killing Thousands of Cats!
I do not wish to bring down everyone's Happy Easter, but I have been so very disturbed since I heard about this a few days ago, that I have to speak out!
Apparently, in preparation for the Olympics, the Chinese govenment has ordered the round-up of thousand of cats.
Working under the misguided premise that these cats bring disease, they have been sending them to death camps, even convincing owners to turn in their own pets!
The Chinese govenment does not have a very good record with human rights, let alone animal rights, but this is horrible even by Chinese standards!
www.alleycats.org has a petition on their website to oppose the trapping and killing of Beijing's cats. Please sign it so we can bring awareness to this atrocity.
For those of you who have blogs, it would be great if you could put a link to their website.
http://www.alleycats.org/china/index.html
Apparently, in preparation for the Olympics, the Chinese govenment has ordered the round-up of thousand of cats.
Working under the misguided premise that these cats bring disease, they have been sending them to death camps, even convincing owners to turn in their own pets!
The Chinese govenment does not have a very good record with human rights, let alone animal rights, but this is horrible even by Chinese standards!
www.alleycats.org has a petition on their website to oppose the trapping and killing of Beijing's cats. Please sign it so we can bring awareness to this atrocity.
For those of you who have blogs, it would be great if you could put a link to their website.
http://www.alleycats.org/china/index.html
Thursday, March 20, 2008
The Red Thread from Bent Creek
The Red Thread
An invisible red thread connects those who are destined to meet regardless of time, place or circumstance. The thread may stretch or tangle, but it will never break.
-An Ancient Chinese Belief-
Bent Creek, known for its little designs that can be put together in a theme, has come up with a design based on the Red Thread.
There is a little design for each month that can also be stitched separately for an ornament, and there is a separate chart for the border. The idea is that the red thread flows through the whole design, tying each one to the other.
It will look like this when it is completed.

Generally, I do not like to stitch "cutsie" things, nor do I like charts that are spread out over a year, but this one caught my eye.
I am stitching it on 32 count Light Mocha. I decided to use DMC instead of the hand dyed threads. I think the DMC looks just fine, and I have the all the colors on hand, which is a plus.
After working on The Chase Sampler for five months, I needed a little change of pace, something lighter!
This is what I have done so far.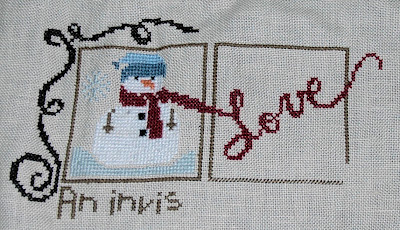
As soon as I get caught up with the third month, I will probably start on another little design. I haven't quite decided which one I will do just yet.
Tuesday, March 18, 2008
Hooray! "The Chase" Sampler is Finished!
Last night I finally finished the verse on "The Chase"!
My first 2008 finish!
I am not entirely happy with the lettering on the verse but there are only so many times you can pull it out without damaging the linen.
I did the entire verse in backstitch. Toward the end, I started having second thoughts about the backstitch. I thought that maybe I should have tried it in a cross stitch, but I think I made the right decision. The little spacers were done in a cross stitch.
There are issues with stamped linen. I stitched in the original verse, however this was not the intent of the kit maker. It was meant to be left blank, or to have you stitch in your own name. The design is stamped on the linen, generally with the grain, however the count is very dense. I noticed that the two stamped lines for the verse were not exactly straight. This made it difficult to square up the letters.
Also, I am not entirely certain of the numeral on Mary's birthday. My best guess is that it is January 9, but it is hard to be completely certain.


All that is left to do now is to gently wash it, mount it, and frame it.

My first 2008 finish!
I am not entirely happy with the lettering on the verse but there are only so many times you can pull it out without damaging the linen.
I did the entire verse in backstitch. Toward the end, I started having second thoughts about the backstitch. I thought that maybe I should have tried it in a cross stitch, but I think I made the right decision. The little spacers were done in a cross stitch.
There are issues with stamped linen. I stitched in the original verse, however this was not the intent of the kit maker. It was meant to be left blank, or to have you stitch in your own name. The design is stamped on the linen, generally with the grain, however the count is very dense. I noticed that the two stamped lines for the verse were not exactly straight. This made it difficult to square up the letters.
Also, I am not entirely certain of the numeral on Mary's birthday. My best guess is that it is January 9, but it is hard to be completely certain.
I signed it by the urn.
All that is left to do now is to gently wash it, mount it, and frame it.
I will have to go to the framers for the frame because of the unusual size. It is about 17" x 25".
I have been collecting frames for years, and yet somehow I never find the right one in my attic!Here is the finished sampler. Not the greatest picture. I will take another one when it is framed.
Friday, March 14, 2008
The "Chase" Sampler - The Original!
I finally found a photo of the original"Chase" Sampler.
 Click on photo to enlarge.
I think the Paragon kit is remarkably like the original!
I enlarged, and lightened the signature and verse section to try to see the spelling of the name.

The name appears on the first and third line. The first line is very faded and hard to see in this photo. On the third line, I can make out "Mary Starker" (near the center). It looks to me that it ends with an "r", which would agree with the Paragon kit.
That is how I am going to stitch it!
Wednesday, March 12, 2008
Issues with "The Chase"
Up to now, I had been trying to fit the information, verse and biographical information on the two lines.
I found out that it was divided up into three lines. The area above the two stitched lines is to be used as a line.
Well, this meant ripping out part of the line I had already stitched.
While doing the research, I encountered another problem.
The biographical information given on the kit clearly lists the girl's name as "Mary Starker". When I tried to research this, I also found references to "Mary Starkey".
Which one is it?
Joanne Harvey of The Examplarery released a new reproduction of this sampler in December of 2006. In that version she shows the name as "Mary Starkey".
I have tried unsuccessfully to find information or a picture of the original.
I would really like to be as accurate as I possibly can, however I would also really like to finish it!
I am wondering if perhap the stitching on the original was hard to read. Could the "r" have looked like a "y"?
If anyone has any information about this, please let me know.
I found out that it was divided up into three lines. The area above the two stitched lines is to be used as a line.
Well, this meant ripping out part of the line I had already stitched.
While doing the research, I encountered another problem.
The biographical information given on the kit clearly lists the girl's name as "Mary Starker". When I tried to research this, I also found references to "Mary Starkey".
Which one is it?
Joanne Harvey of The Examplarery released a new reproduction of this sampler in December of 2006. In that version she shows the name as "Mary Starkey".
I have tried unsuccessfully to find information or a picture of the original.
I would really like to be as accurate as I possibly can, however I would also really like to finish it!
I am wondering if perhap the stitching on the original was hard to read. Could the "r" have looked like a "y"?
If anyone has any information about this, please let me know.
Tuesday, March 11, 2008
Free DMC Cross Stitch Starter Kits!
I was surfing about on a freebie (www.shop4freebies.com) website when I came upon this offer.
DMC will send you 4 mini kits when you sign up to be a DMC Mentor! http://www.dmc-usa.com/majic/pageServer/19060000mb/en_US/index.html
The DMC Cross-Stitch Mentoring Program is designed to share your love and passion for cross-stitch with a friend, family member, scout troop, class or anyone you think would enjoy cross stitching as much as you do.
Worth a look!
DMC will send you 4 mini kits when you sign up to be a DMC Mentor! http://www.dmc-usa.com/majic/pageServer/19060000mb/en_US/index.html
The DMC Cross-Stitch Mentoring Program is designed to share your love and passion for cross-stitch with a friend, family member, scout troop, class or anyone you think would enjoy cross stitching as much as you do.
Worth a look!
Hooray! "The Chase" Backround Finally Finished!
Last night I finally finished the background!

This step took longer than anything else. The long outline stitch can be very tedious. If I had it to do over again, I think I would have worked the background a little at a time. I thought of doing this but I was afraid the discontinuity would show up in the stitches. Now I don't think this would have been a problem. There is enough variation in the stitches done in one sitting anyway.
Of course, by the time you get to the end, you have mastered the sitch. I found that in many cases it was easier to turn the work sideways and work on it that way rather than working it vertically.
Next I have to do the signature line and the verse.
 I have used some straight pins to measure out the eight, quarter and halfway points along the line to try to get an idea of the spacing.
It will have to be done in a straight stitch. There is no room for a cross stitch.
There are no guidelines given for this at all. I will have to play around with it a bit. It will be a tight fit to get everything on the lines.
I need to do a little more research on the Colonial alphabets.
I was thinking of doing the verse and the signature line in a medium pink. I think pink would have appealed to an eleven year old girl.
Wednesday, February 27, 2008
Do You Feel Lucky?

This is a complete kit, including the chart from LHN, full skeins of CC and Zweigart 28 count flax linen, all pictured. You can find more about this kit here.
TO ENTER, all you have to do is stop by, http://stitchpink.blogspot.com/2008/02/win-where-there-is-life.html and leave a comment!
This is a great way to bring attention to such a good cause!
Good luck!
Tuesday, February 19, 2008
Moving right along on "The Chase"
Well, I have finally finished all the flora and fauna at the bottom of the sampler. There was a ton of detail on the animals. Then they all had to be outlined, so it took some time.


The berries were interesting to work. The berry itself was worked in a darning stitch. First I made several long vertical stitches. Then the thread was actually woven under and over the long stitches to create the effect. Then the berries were outlined with the outline stitch.
Now I am working on filling in the landscape. It is all done in a long outline stitch.
This part surprised me. I thought it would go faster (no going back and forth to the pattern). The long outline stitch is a little tricky on this fabric. If it were done on 28 or 32 count, even 36 or 40 count linen, the holes would be easier to find. This is the older kind of Belgian linen that is very dense. It is often necessary to puncture the fabric to get the needle through.
We are all used to working horizontally, but the long-outline stitch is worked vertically.
You have to be careful, especially in the long runs along the border, to keep the lines relatively straight. There is a tendency for them to "lean".
This part is going very slowly, but atleast I can see the light at the end of the tunnel!
Next, I will have to figure out how to proceed with the verse and the signature.
By now, I am just itching to finish this!
I still haven't decided what my next project will be.
I do have to work on my braided rug again, so I am looking for something light to work on in-between.
Wednesday, February 6, 2008
Hooray!
 I have finally gotten a copy of Village-by-the-Sea"!
YEA!!!
I have been after this one for ages!
Many thanks to Sue, a wonderful seller on ebay!
Sue has the inventory of a closed needlework shop. She sells under the ebay name of stitchnut. She has both current and vintage designs, kits, fabric, fiber and books!
You never know what she will be listing next! On top of that she offers great service with reasonable shipping rates!
If you are looking for a particular item you should check her listing. She may just have what you are looking for! http://search.ebay.com/_W0QQsassZstitchnut
Here are some more goodies I got from Sue!

Monday, February 4, 2008
Newbury, Newburyport, "The Chase" Sampler Variations
I have wanted to do this sampler for a very long time, so before I decided which one I wanted, I did as much research as I could.
I was never able to find a picture of the actual sampler. Although it was stitched in New England, the original is in the Williamsburg collection.
The one I picked was the Paragon kit version ("The Chase"), that appeared in America Home Magazine in 1970. At first it almost seemed like cheating because the design is stamped on the linen. I had become used to doing counted cross stitch, but I came to appreciate the detail that went into reproducing it.
Another kit was the Elsa Williams version. I didn't choose this one because it was all cross stitch, and I wanted the sampler to have the stitches that were in the original. The different stitches give it a wonderful 3-dimensional effect.
Another pattern is "The Newburyport Sampler", from the Samplar Workes 1995. (See picture below). This one also has many of the fancier stitches.
Then it hit me! The sampler is too perfect! It was made for modern eyes. It is perfectly symetrical on both sides with the pictural design falling neatly between the borders.
It is a beautiful sampler, and lovely to look at, but it does not look to me as if it were done by an 11 year-old, no matter how good she was!
Then I did more research and found pictures of actual samplers from Newbury(port) around that time. They most ressembled the Paragon kit. I am not a historian, but I do enjoy working on a piece that is closer to the original. To me the Paragon sampler looks like it "grew" as the design grew. The borders seem to expand because the pictural design didn't quite fit between the borders, and had to be adjusted!
I find that kind of imperfection comforting!
I was never able to find a picture of the actual sampler. Although it was stitched in New England, the original is in the Williamsburg collection.
The one I picked was the Paragon kit version ("The Chase"), that appeared in America Home Magazine in 1970. At first it almost seemed like cheating because the design is stamped on the linen. I had become used to doing counted cross stitch, but I came to appreciate the detail that went into reproducing it.
Another kit was the Elsa Williams version. I didn't choose this one because it was all cross stitch, and I wanted the sampler to have the stitches that were in the original. The different stitches give it a wonderful 3-dimensional effect.
Another pattern is "The Newburyport Sampler", from the Samplar Workes 1995. (See picture below). This one also has many of the fancier stitches.

Then it hit me! The sampler is too perfect! It was made for modern eyes. It is perfectly symetrical on both sides with the pictural design falling neatly between the borders.
It is a beautiful sampler, and lovely to look at, but it does not look to me as if it were done by an 11 year-old, no matter how good she was!
Then I did more research and found pictures of actual samplers from Newbury(port) around that time. They most ressembled the Paragon kit. I am not a historian, but I do enjoy working on a piece that is closer to the original. To me the Paragon sampler looks like it "grew" as the design grew. The borders seem to expand because the pictural design didn't quite fit between the borders, and had to be adjusted!
I find that kind of imperfection comforting!
Progress on "The Chase"
A bit more progress to report, but it is still very slow-going.

I finished the borders on both sides, and I have finally finished the urn! That urn took forever! Each section is done with a satin stitched and then outlined. Some of the areas are quite tight to work in.
The next step was to do the antlers on the deer which was all done in outline stitch. A lot of ins and outs!
Then, on to body of the deer, with a French knot for the eye. Right now I am working on the largest part of the body which calls for a "long outline" stitch. I was having a hard time to get this to look neat, and wound up taking it out several times. I still don't seem to have the rhythm of it down!
By the time you get to the end of a section, you have really mastered the stitch and you wish you had done it better in the first part! I guess that's how the school girls who first worked on samplers, must have felt also!
Originally I wasn't going to put in any verse. There isn't any place marked for this. It is just mentioned on the front of the kit. I spent a lot of time trying to find a picture of the original online without any success. I did however find a later sampler circa 1815, also from Newburyport. It was very similar to this one. It appears that the verse was originally just above where the two blank lines appear. I think in this design, the area where the verse went was filled in with some lines of designs (green squiggle type lines).
According to the description, the original verse was "Goodness and Mercy Ever follow [t]hose who shape there [sic] Conduct by Gods Holy Laws".
I did some playing around with the lettering. It would be really tough to fit this in just the two lines provided. It will definitely not fit in cross stitch. It would have to be done in a straight stitch I think. This will take a bit of experimenting as there are no guidelines given.
Great, just when I was looking forward to finishing this one up, now it will take even longer! I think it might be time well spent if it works though, otherwise, I will just take it out and leave it blank. I think if I didn't try, it would bother me every time I passed it in the hallway!
Saturday, January 26, 2008
Look what the mailman brought!
The Elsa Williams Crewel Mirror Kit!


Yet another addition to my stash!
I will have to live to be very old to make a serious dent in that pile, but I couldn't resist this one!
I love these old kits! I can remember seeing them in magazines years ago.
I don't know when I will get to this one though. There are quite a few projects ahead of it!
Thursday, January 24, 2008
Progress on "The Chase"

Just a bit of progress to report on "The Chase".
I finished the tree and moved on to the second floral spray.
I have so far finished the bird and three of the flowers, as well as part of the stem.
This part is very slow-going because of all the outlining.
I did enjoy doing the French knots in the center of the flower. I used to hate them because I had so much trouble with them, but now they seem very easy to do.
Monday, January 21, 2008
Foiled Again!

I have been trying to get ahold of the cross stitch pattern Village by the Sea for what seems like ages now!
I was hoping it would be my next project. Ebay can either be a blessing or a curse! This is the third time I have been outbid on this pattern. It does not come up very often, and it stings to lose out on it!
I even placed a $8 phone call to the Columbus Museum of Art. I spoke to the manager of the Gift Shop. He said that there was a Stuck exhibition several years ago, but he had no recollection of these patterns and did not think they were sold by the museum. Strange!?!
I was planning to stitch it with Needlepoint Silks (navy) on sand colored lin en. I am looking for something traditional that I could hang in my dining room.
 en. I am looking for something traditional that I could hang in my dining room.
There were parts of the design that I was thinking of changing. Maybe I should just go ahead and design my own pattern!
Oh course that would probably take forever!
If anyone knows where I might get this pattern, please let me know.
Wednesday, January 16, 2008
The Chase Sampler
 The sampler I am currently working is "The Chase Sampler".
It was an older sampler, packaged by Paragon. I thought it might be relaxing while I was also working on my rug, to work on a pattern that had been stamped onto the linen.
This pattern is based on one that is at Williamsburg, but was originally from New England.
I completely underestimated how complex this pattern was!
The first section was mostly cross stitch and went along smoothly enough. The second section however was all the fancy stitches which I have really enjoyed, but it has taken much longer than I thought it would!
I had hoped to finish it in 2007, but no way that was going to happen!
I have made good, steady progress on it though. I have finished the first urn and floral scene. That urn took forever. It was all done in a satin stitch and outlined in the outline stitch.

The next bit was the foliage, leaves and fruit on the tree. That took quite a while. Again this was all satin stitch, outlined with the outline stitch. Outlining the leaves in a contrasting color really gives the leaves a dimensional look.
 Now, I am working on the trunk of the tree. The stitch used is a long outline stitch, to produce the textured look of bark. Then, the trunk will be outlined. This is pretty slow-going.
Originally the sampler had a very pious inscription on the two lines. So far I have left them blank. I haven't found anything suitable to put in. I think it looks alright blank. I was planning to sign my initials next to one of the urns.
It is just about now in a project when I start to get antsy to finish it! I am forcing myself to finish all projects before I start the next (well atleast the stitching part. All bets are off when it comes to framing, etc.). It doesn't stop me from trying to decide what my next project will be though!
Tuesday, January 15, 2008
2007 Christmas Ornament

Normally I make at least one Christmas ornament every year, if not more than one. This year was so busy I only had time to make one.
I chose The 2000 Snowman Ornament "Rejoice" from Homespun Elegance.
I used 32 count Wichelt Twilight Blue for the linen. I didn't sew on the little snowflake charm because somehow it looked out of place. I'm not really big on charms anyway.
I was not really pleased with the finishing however. I finished it with the jute trim, according to the instructions, but I just don't care for the way it looks. One of these days when I have time, I will redo it.
Monday, January 14, 2008
My Braided Rug
Before I got involved with painting my living room and dining room late last fall, my main project was my braided rug. I have always liked braided rugs, but never thought the shape of my living room was right for one. It is very long and narrow, about 11' by 18. With various entry ways placed in inconvenient places, it is not an easy space to position a rug.
It is also very physical. I found that it hurt my wrist quite a bit in the beginning. I had to keep stopping. Also, it seem the only way I can do a good job on the braiding is to do it standing up, so it does get tiring.
Unfortunately I didn't take any pictures of the very beginnings of the rug, but here are a few that I took in October. The colors are a bit washed out in them. It is a little bit brighter than these pictures would have you believe. Furrytail (my Maine Coon), and Ollie (Orange tabby) take turns supervising the work! It is really getting too big to work on the 2 tables I have put together.


The colors are totally different from the picture in my head. I am sort of making it up as I go along. I will have to start planning a bit more closely as I get nearer to the end though. It is becoming difficult just getting enough wool for one round. Quite the challenge!
I don't know what I was thinking when I thought I might finish it by the holidays! HA HA! Maybe the holidays NEXT year!!!
After looking endlessly online and through catalogs, I decided that if I wanted one to fit the room, I would have to make one! Also, I really disliked the fact that it was practically impossible to find a rug made of natural fibers at a reasonable price. I had been collecting wool for years, and some time ago I had even made an effort to make a rectangular braided rug, by just lacing the strips randomly together. I was never quite sure why, but it just never looked right. I decided it lacked definition. It needed a predominant color to pull it together, but also, I decided that there was something inherent about the oval shape that made it very agreeable.
The beginnings of a new rug soon started taking shape on my dining room table!
It didn't take me long before I realized that this is going to be a very, very long project! One of the hardest things was to figure out how much I needed for each row. It is no big deal in the beginning because the rows are all short, but I can see that towards the end of the rugs the last few rows are going to be a challenge to get enough in each color.
It is also very physical. I found that it hurt my wrist quite a bit in the beginning. I had to keep stopping. Also, it seem the only way I can do a good job on the braiding is to do it standing up, so it does get tiring.
Unfortunately I didn't take any pictures of the very beginnings of the rug, but here are a few that I took in October. The colors are a bit washed out in them. It is a little bit brighter than these pictures would have you believe. Furrytail (my Maine Coon), and Ollie (Orange tabby) take turns supervising the work! It is really getting too big to work on the 2 tables I have put together.


When these pictures were taken, it measured about 88 inches long, by 42 inches wide. Something went wrong in the beginning. There is supposed to be a difference of 48 inches from the length and the width., and actually I would have preferred about 50". I have not gotten it up to 46".
The colors are totally different from the picture in my head. I am sort of making it up as I go along. I will have to start planning a bit more closely as I get nearer to the end though. It is becoming difficult just getting enough wool for one round. Quite the challenge!
I don't know what I was thinking when I thought I might finish it by the holidays! HA HA! Maybe the holidays NEXT year!!!
Well after I took the pictures, I had had a major setback for my rug. I was using a thinner piece of wool because I needed the color. I had my doubts about it, but kept going anyway. It was so thin that it was folding over in the braid. I was able to control it somewhat on the side I was working on, but when I looked on the other side I knew I had to take it out. The other side was wrinkled, folded in almost every fold. Since the rug is supposed to be reversible, I didn't think it would look very nice! I wound up undoing 3 rows! 3 BIG rows! Could have done without that! I decided to stop working on it while I concentrated on the painting.
New Year! New Beginnings!
Well I am about to foray into the brave new world of blogging! I have been meaning to for a while as a way to keep myself motivated to finish all my projects.
I also hope to hone my photography skills by hopefully submitting photos with every posting.
I usually have atleast one, if not more projects going on at the same time. It has turned out, by no desire of my own, that fixing up my old house has become a life-long work-in-progress. This takes up a lot of time, but I do manage occasionally to fit in some more "fun" projects!
I also hope to hone my photography skills by hopefully submitting photos with every posting.
I usually have atleast one, if not more projects going on at the same time. It has turned out, by no desire of my own, that fixing up my old house has become a life-long work-in-progress. This takes up a lot of time, but I do manage occasionally to fit in some more "fun" projects!
Subscribe to:
Posts (Atom)

 Posts
Posts


