Thursday, August 28, 2008
Laser Eye Surgery Update
I went back to the doctor within 24 hours for a check. He said everything looked good.
I am still experiencing some fluctuations in my vision, which is to be expected, but for the most part, I think the healing is coming along very well.
I will go back in three weeks for another check-up.
Of course, I haven't accomplished a lot of stitching during this time.
Foolishly, I tried to go back to stitching a little too early. My eyes were too "jumpy" to count, and I paid for it with a lot of frogging the following evening!
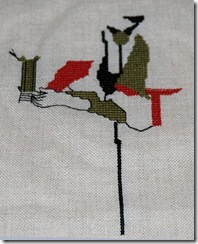
I have managed to get a little done on the Glasgow Poster. I will post a picture later.
Wednesday, August 20, 2008
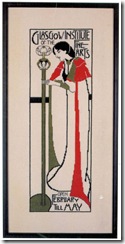
Glasgow Poster
After finishing one project, I always try to make the next one something completely different.
Without any doubt, my favorite design period is the Arts and Crafts era (the last few years of the 19th century and the first few years of the 20th century). This movement was taking place in Britain and America simultaneously.
The Royal School of Needlework was founded in 1872 to train young gentlewomen in the art of embroidery and to raise the standard of design. I have a great book, simply titled An Embroidery Book, written by Anne Knox Arthur of The Glasgow School of Art, in 1931.
This is a wonderful book, written by a a remarkable woman. There are thirteen chapters on different methods of embroidery, as well as a wonderful forward by Ann Macbeth. I would heartily recommend this book if you can get your hands on it. It is an inspiration!
Poster, from Charlotte's Web Needlework, is based on a design by Charles Rennie Mackintosh.
I have had this in my stash for some time now.
I have made a small start on this. You can just barely see the outline of her hand, and part of her dress.
Monday, August 18, 2008
It was Bound to Happen Eventually. . . .
Sunday, August 17, 2008
Beach Roses is Finished!
Laser Eye Surgery Update
I have researched it as well as I can, and have decided to go ahead with it.
I have been thinking about it for years. When I first looked into it, laser surgery was not available for farsightedness, but now it has been available for several years. My thinking is, "if not now, when"?
This is not being done without a certain amount of trepidation however!
I have been assured that it a very safe procedure.
Still ... hmm! Just hope all goes well. After reading that consent form, I all but changed my mind!
Would love to hear from anyone who has been through this.
Thursday, August 14, 2008
Thank You's and Beach Roses
I have picked up Just Nan's Beach Roses that has been sitting in my stash for quite a while.
This design just cries out to be done during the summer, preferably while sitting with an ocean view, but sometimes that just can't be arranged.
I figured there was just about enough summer left to finish this design.
It is tiny, just 3-1/2" square, but very detailed.
Unfortunately there has been a lot of frogging going on here!
First of all, the chart is tiny and a little hard to read. (Would it have killed them to print it on a full page instead of a half page)? Also, there is just enough variation in the wave border, and just slight variations in the color to make it difficult! One little mis -stich and it is hard to find where you have gone wrong.
All that said, I love the design, and I am looking forward to finishing it up.
I am stitching it on 28 count Lambswool, using DMC.
Here is my progress so far:

Tuesday, August 12, 2008
The Red Thread as a Draft Dodger!

(Click to enlarge)
Ready, willing and able to stand up against any drafts that try to come in under my porch door!
I also have a picture of it sitting on my mantle.
Tutorial: How to Make a Draft Dodger or Shelf Sitter
2) The edges have already been zig-zag stitched, but if you would like to make a ruffled edge, turn under the edges on the ends and stitch. (If you do not want the tied enclosure, you can sew up the end and then later hand stitch the other end when it is completed).

3) Right sides together, pin the long edges together and sew a 1/4 inch seam.
4) Turn it right side out. You now have a sleeve. Just press it very lightly (no hard creases).
5) Next, I cut 3 pieces of floss (18 single strands) about 24" long. I used DMC 221 because it matched The Red Thread in my design. (You could use any cording you wanted. You just have to make sure you can weave it through the linen without ripping it). About an inch from the end of the design, starting in the front, center of the design, I wove the floss all around it.
6) Then I threaded some wooden beads onto the end of the floss and tied a knot. I wrapped the floss around the sleeve a couple of times and pulled it up tightly
 7) The stuffing was next. For a shelf sitter, you can use a light fiber fill, but for a draft dodger you need something a bit heavier. After quite a bit of experimentation, I decided to use Feline Pine, which is compressed pine pellets. This can be found in specialty pet food stores. Do not confuse this with regular cat litter, which did not work well at all. The pellets are much larger, and it is completely dustless. Of course you can also use dried beans or rice.
Although you could put the filling in directly, I decided to enclose it in pantyhose. This is a little tricky because the pantyhose will just keep stretching, so the best thing to do is to put the leg into the opening and start filling it a little at a time. As you fill it, the weight will drag it down to the bottom of the sleeve. This works much better than trying to stuff it in.
When it is filled. tie off the top of the pantyhose leg in a knot.
8) I finished the other end off in the same way, added the beads, and pulled it up tight.
 (Click to enlarge all images)
Sunday, August 10, 2008
The Red Thread is Connected!
This is Connected, the twelfth and final design in The Red Thread. I finished this up on Friday. The two little snowmen (snow people) are now connected!
I took a picture but it seems a little washed out. It is over a yard long, and my photography skills are not the greatest! Here is how the whole thing looks:
I am still working out how to finish it. As soon as I do, I will post a picture.
Wednesday, August 6, 2008
I Won an Award!
 Oh my gosh!
Riona nominated me for this award! Thank you so much! I really appreciate it although I don't know what I have done to deserve it. Lately I do not feel especially creative!
The rules for receiving this award are:
1) Put the logo on your blog.
2) Add a link to the person who awarded you.
3) Nominate at least 7 other blogs.
4) Add links to those blogs on yours.
5) Leave a message for your nominees on their blogs.
Nominating 7 blogs that inspire me is tough because I get inspiration from so many of you out there!
In no particular order, I would like to nominate:
Nicola - Tales from My Needle
Jayne - Ginnie's Cross Stitch
Helen - Stitchery Nook (I know you have won this before Helen, but you deserve it again)!
Diane - Suburban Stitcher
Stephanie - In Stitches
Lee - Lake Stitcher
Kathy - Purple Wildcat
...and to all the rest of you! You all give me inspiration!
Tuesday, August 5, 2008
Thankfully, Thankful is Done!
 This is the eleventh design in The Red Thread series.
The next and last design is Connected.
I am close to finishing, but the next one will take some time because I have to go back and sew on all the little snaps and stars on the border.
I am still thinking about various ways to finish this design. Not sure if I want to frame it or not. I was thinking about the possibility of making a draft dodger out of it. Hmmm! We'll see.


